


 "California Dreaming" is made from a retro scarf and some gingham ribbons.
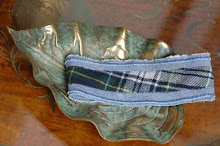
 Named "Coco" this version is made with white lace, layered on top of plastic lime plastic lining, and finished with pleated and polka dotted ribbons, black jet and crystal buttons.
 It all started with a family heirloom, a fun, souvenir scarf printed with charming scenic spots in California. Even though it was colorful and intriguing, it was never worn because it is synthetic. Now it has been recycled into my every-morning-most-favorite-shower-cap named "California Dreaming" and as I write this post, is hanging on a peg in the bathroom! If you want to make one yourself, here are the easy steps. It only takes about an hour from start to finish.
 Materials:
1 scarf (synthetic is best because the water just splashes off)
1 plastic shopping bag (this will be your waterproof lining)
1 yard of 1" wide, synthetic, turquoise ribbon
1 yard of 1" wide synthetic yellow ribbon
1 funky retro button
1 yard ¼" wide elastic
Red thread or another color that contrasts your scarf print
Your sewing basket and a sewing machine
How to do it:
-Cut a 20" diameter circle, out of the scarf and out of the plastic shopping bag.
-Pin the 2 circles together and stitch ½" from the edge, all around the perimeter.
-Sew the turquoise gingham ribbon around the perimeter with a zigzag stitch.
-Sew the yellow gingham ribbon, with a double row of zigzag stitches ½" apart, leaving an opening to slide the elastic through. And like in the photos, the turquoise ribbons in fluttering below the yellow ribbon.
-Sew the yellow gingham ribbon, with a double row of zigzag stitches ½" apart, leaving an opening to slide the elastic through. And like in the photos, the turquoise ribbons in fluttering below the yellow ribbon.
-Attach a safety pin to your elastic; slip it through the opening, sliding it along, until you come out at the other end. Holding the elastic ends together, adjust the ease to fit your head, and then cut off excess and stitch elastic ends together securely.
-Form a loop from the turquoise ribbon (this is to hang your shower cap on a peg.) 
-Pin the loop on top of the join point of your ribbon trims (so it hides the join.) Sew securely in place with a button. (My turquoise ribbon is a simple seam binding, pressed open, left with raw edges. )


2 comments:
This one I certainly will give a try. So creative!!! The warmest and fondest wishes to you. E
love this, Nancy. Just what I need too!
Post a Comment