


 Click here for PDF version and patterns
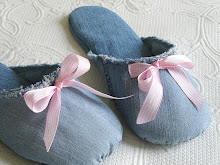
These pretty ballet slippers -- a most enjoyable and fun sewing project -- can be made in a leisurely afternoon. Rummage through your left over fabric scraps and notions, get started and before you know it, you will be admiring your handiwork as you pad around in your cozy new slippers.

What you need …
**unless the yardage is noted, lay your patterns on the material to determine the yardage
• Re-cycled denim
• Cotton fabric (pink gingham) for lining
• Cotton fabric (eggplant floral print) for piping, heel trim and ruffles
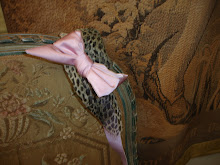
• 24” x 5/8” wide velvet (raspberry) ribbon, cut in half
• Iron on interfacing
• Cardboard
• Leather, vinyl, denim or another durable material, for the sole
• 1 yard x ¼” wide elastic, cut in half
• Thread, scissors, pins, pencil, needles, sewing machine
• PDF (click here) upper, sole and ruffle patterns
**unless the yardage is noted, lay your patterns on the material to determine the yardage
• Re-cycled denim
• Cotton fabric (pink gingham) for lining
• Cotton fabric (eggplant floral print) for piping, heel trim and ruffles
• 24” x 5/8” wide velvet (raspberry) ribbon, cut in half
• Iron on interfacing
• Cardboard
• Leather, vinyl, denim or another durable material, for the sole
• 1 yard x ¼” wide elastic, cut in half
• Thread, scissors, pins, pencil, needles, sewing machine
• PDF (click here) upper, sole and ruffle patterns
Check the fit before you start …
The pattern included is an adult, medium size. To check the fit, stand on the sole pattern. It should peek out around the perimeter of your foot. If you need to reduce or enlarge the pattern, cut the pattern in quarters down the middle, and then extend, or overlap the pieces to fit your foot. Tape together, smooth out the new lines, and apply the changes also to the upper pattern. Then cut an upper and sole out of some leftover fabric, gather the toe and baste the two pieces together. Slip it on, check the fit, and apply any further adjustments to your pattern pieces.
• Cut the floral accent fabric: Cut two bias strips 1” x 24” wide from the floral print for the piping + 4 x half-moon pattern for the ruffle + 2 strips 1 ½” wide x 3” long for the heel trim.
• Transfer all pattern notches.
• Cut two cardboard soles (cutting 3/8” smaller all around the perimeter of the Sole
Pattern. (If you like your slippers more cushiony cut out a pair of foam liners as well.)
Easy to follow sewing instructions…
Denim Upper and Sole:
Iron the interfacing on the back side of the denim uppers and soles.
Sew a row of basting stitches between the toe notches. Stitch the heel together with a 3/8” seam allowance and press open.
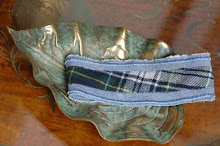
Reinforce the heel seam with the cotton floral fabric as follows: Interface 3” strip floral accent fabric. Fold back ¼” seam allowance along each length and press. With wrong sides facing each other, center strip over the heel seam. Pin and trim any excess off the top and bottom so strip aligns with denim edge. Edge stitch along each length. Pull the toe basting thread, easing gathers, so that the toe will curl under softly. With right sides facing, pin the upper to the sole, matching notches. Baste and remove pins. Stitch seam with 3/8” seam allowance. It is a wee bit tricky, so take your time to stitch a neat, curved line, with toe gathers evenly distributed.
  Turn right side out. With something firm, like a pair of blunt scissors, press firmly on the seam, to give it a pressed finish.
Make Lining:
Iron interfacing to the cotton lining upper and sole.
Following above instructions for the denim, stitch the lining upper to the sole.
Assemble Slipper:
Slip cardboard soles inside slippers.
*If you like your slippers cushiony then slip the foam soles on top of the cardboard.
Slip the linings inside the slippers, smoothing neatly in place. Pin.
Baste together all around the perimeter of the edge.
Trim off any lining that extends beyond denim.
Make the Ruffle:
With wrong sides facing, stitch one pair of ruffles together, sewing ¼” around the half circle shape but not the bottom.
Turn ruffle inside out and press.
Stitch a row of basting stitches ¼”, along the bottom edge. Pull the basting stitches to form soft gathers.
Pin ruffle, centered, aligned with denim edge, to slipper front. Baste and remove pins.
Add Slipper Piping and Elastic:
With right sides facing each other and edges aligned, pin the bias floral fabric all around the perimeter of the slipper edge. Baste, remove pins. Stitch ¼” around the edge.
Zigzag stitch the elastic around the slipper edge as follows: Align the elastic with the slipper edge on the inside, pinning it all around with a little ease. (You only need a little elastic ease for a good fit.) Zigzag stitch down elastic center.
Press the floral bias piping up. Fold it over the edge, and tuck the seam allowance under. Pin it around the perimeter so that you have a neat piped edge.
Hand stitch the piping closed, with the stitching line following the seam join point on the right side, so that your stitches are hidden. Be careful to pull the elastic as you stitch, to maintain the ease.
Velvet Ribbon Bows:
Tightly tie two small bows. Cut bow ends at diagonal angle.
Hand tack bows to cover the join point of the ruffle.
Pad around with a big smile and enjoy!

The pattern included is an adult, medium size. To check the fit, stand on the sole pattern. It should peek out around the perimeter of your foot. If you need to reduce or enlarge the pattern, cut the pattern in quarters down the middle, and then extend, or overlap the pieces to fit your foot. Tape together, smooth out the new lines, and apply the changes also to the upper pattern. Then cut an upper and sole out of some leftover fabric, gather the toe and baste the two pieces together. Slip it on, check the fit, and apply any further adjustments to your pattern pieces.
Cut your pieces …
• Cut two denim uppers + two upper interfacings.
• Cut two soles from the durable material.
• For the lining, cut two soles and two uppers out of the pink gingham + two sole and two upper interfacings.• Cut two denim uppers + two upper interfacings.
• Cut two soles from the durable material.
• Cut the floral accent fabric: Cut two bias strips 1” x 24” wide from the floral print for the piping + 4 x half-moon pattern for the ruffle + 2 strips 1 ½” wide x 3” long for the heel trim.
• Transfer all pattern notches.
• Cut two cardboard soles (cutting 3/8” smaller all around the perimeter of the Sole
Pattern. (If you like your slippers more cushiony cut out a pair of foam liners as well.)
Easy to follow sewing instructions…
Denim Upper and Sole:
Iron the interfacing on the back side of the denim uppers and soles.
Sew a row of basting stitches between the toe notches.
Stitch the heel together with a 3/8” seam allowance and press open.Reinforce the heel seam with the cotton floral fabric as follows: Interface 3” strip floral accent fabric. Fold back ¼” seam allowance along each length and press. With wrong sides facing each other, center strip over the heel seam. Pin and trim any excess off the top and bottom so strip aligns with denim edge. Edge stitch along each length.
Pull the toe basting thread, easing gathers, so that the toe will curl under softly. With right sides facing, pin the upper to the sole, matching notches. Baste and remove pins. Stitch seam with 3/8” seam allowance. It is a wee bit tricky, so take your time to stitch a neat, curved line, with toe gathers evenly distributed. Turn right side out. With something firm, like a pair of blunt scissors, press firmly on the seam, to give it a pressed finish.Make Lining:
Iron interfacing to the cotton lining upper and sole.
Following above instructions for the denim, stitch the lining upper to the sole.
Assemble Slipper:
Slip cardboard soles inside slippers.
*If you like your slippers cushiony then slip the foam soles on top of the cardboard.
Slip the linings inside the slippers, smoothing neatly in place. Pin.
Baste together all around the perimeter of the edge.
Trim off any lining that extends beyond denim.
Make the Ruffle:
With wrong sides facing, stitch one pair of ruffles together, sewing ¼” around the half circle shape but not the bottom.
Turn ruffle inside out and press.
Stitch a row of basting stitches ¼”, along the bottom edge. Pull the basting stitches to form soft gathers.
Pin ruffle, centered, aligned with denim edge, to slipper front. Baste and remove pins.
Add Slipper Piping and Elastic:
With right sides facing each other and edges aligned, pin the bias floral fabric all around the perimeter of the slipper edge. Baste, remove pins. Stitch ¼” around the edge.
Zigzag stitch the elastic around the slipper edge as follows: Align the elastic with the slipper edge on the inside, pinning it all around with a little ease. (You only need a little elastic ease for a good fit.) Zigzag stitch down elastic center.
Press the floral bias piping up. Fold it over the edge, and tuck the seam allowance under. Pin it around the perimeter so that you have a neat piped edge.
Hand stitch the piping closed, with the stitching line following the seam join point on the right side, so that your stitches are hidden. Be careful to pull the elastic as you stitch, to maintain the ease.
Velvet Ribbon Bows:
Tightly tie two small bows. Cut bow ends at diagonal angle.
Hand tack bows to cover the join point of the ruffle.
Pad around with a big smile and enjoy!


 Awhile ago,


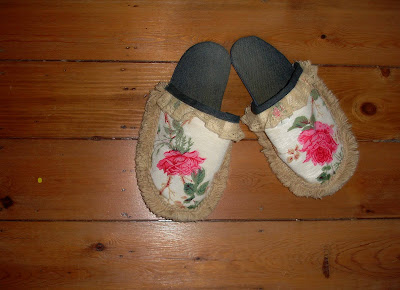 ...such as the ones above made with a Liberty cabbage rose print, re-cycled denim soles and antique lace and fringe trims ... and when you finish, just put your feet up and gaze at your lovely handywork. Ahh, all is a day's work.

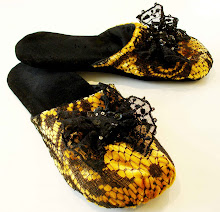
 Named "Coco" this version is made with white lace, layered on top of plastic lime plastic lining, and finished with pleated and polka dotted ribbons, black jet and crystal buttons.
  Materials:


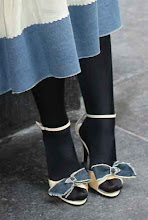
 (above and below - Ralph Lauren Spring 2010 collection)
  The look is never more charming when it is authentic and you do it yourself, mending, patching or beading your own way.
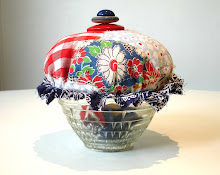
 If, like me you are always collecting and gathering special mementos - like postcards, photos and sketches - that inspire thoughts and memories of events or ideas that you want to remember or reflect on, ... then here is a easy and fresh way to display them around your home ---
 Once I started I kinda went crazy with all kinds of version. At the very top image, on the library mantle, I used blue and green water bottles cut down, with yogurt and can tops; and in the image just above, from the left -- a feta cheese container, upside down; the bright yellow top of a windex spray; the top of a starch spray can; and an upside down chocolate dessert container. The photo of the model in the denim skirt, by the way, is from my book,
  The version above from the left is the top of a whipped cream container, the chocolate dessert container, the spray top, and the feta cheese container.
 Click the link


